Qt for Python
Qt框架是一个跨平台的C++应用程序开发框架,由Qt公司开发。Qt框架提供了一组丰富的GUI组件和工具,用于开发Windows、Linux、macOS等操作系统的应用程序。Qt for Python也叫Pyside,是一个基于Qt框架的Python绑定库,它可以让Python开发者使用C++编写的Qt应用程序。本文主要讲Qt for Python的安装和使用。
Qt for Python环境搭建
安装基础环境(Linux,Windows不用)
1 | sudo apt update |
1 | sudo apt upgrade |
1 | sudo apt-get install libxcb-* |
1 | sudo apt-get install libxkbcommon-x11-0 |
搭建Python环境
我的Python环境主要依赖于uv,有关uv的详细内容可以参考我的博客uv
创建Qt环境
1 | uv init |
安装Qt for Python
1 | uv add pyside6 |
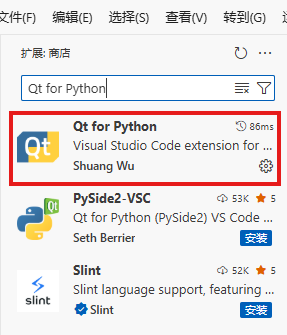
安装VSCode Qt for Python插件
解决输出界面所有中文乱码中部分的乱码问题(标题乱码未解决)(Linux)
1 | sudo apt-get install fonts-noto-cjk |
解决wayland错误(Linux)
Failed to create wl_display (No such file or directory)
qt.qpa.plugin: Could not load the Qt platform plugin “wayland” in “” even though it was found.
在代码中加入下面这一行
1 | import os |
Qt打包
使用pyside6-deploy打包exe文件时,可以通过修改nuitka的一些参数来达到想要的效果
pyside6-deploy打包exe不显示终端窗口
这里假设你的主文件是main.py文件。
生成打包配置文件pysidedeploy.spec
1 | pyside6-deploy --init |
在pysidedeploy.spec文件中[nuitka]的extra_args中添加下面的参数
1 | --windows-console-mode=disable |
运行打包命令
1 | pyside6-deploy |
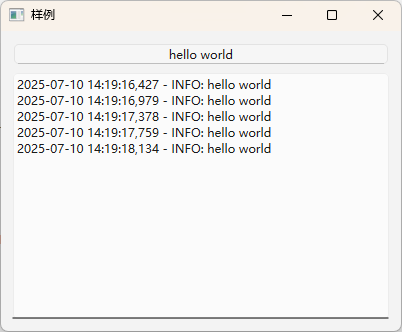
Qt使用GUI实时显示logging信息
要实现Qt使用GUI实时显示logging信息这个功能,需要两个条件,一个是给logging添加QtHandler,另一个是使用QThread执行运算程序,主线程用来更新界面显示。
QTextBrowserHandler
由于Qt显示logging的GUI工具是TextBrowser,所以我定义了一个QTextBrowserHandler类,用来将logging的信息输出到TextBrowser中。
1 | class QTextBrowserHandler(logging.Handler, QObject): |
QThread
QThread是Qt中的线程类,用来执行耗时的操作。我定义了一个QWorkThread类,用来执行run函数。
1 | class QWorkThread(QThread): |
简单样例
新建example.ui文件,使用VSCode插件编辑界面,这个编辑后保存的文件
1 |
|
这个文件是插件自动根据.ui文件生成的。
1 | # -*- coding: utf-8 -*- |
这个是执行文件,里面有之前的两个工具,还有一个打印hello world的run函数。
1 | import sys |
这是这个程序的显示结果